Garmin InReach Explorer+ Review: A Deep Dive
I’ve already carried out some side-by-side comparisons of satellite communicators and navigator devices but finally decided to get a Garmin InReach Explorer+ review out there for our readers. Read this post for an even bigger selection of what we consider the best satellite messengers of 2023.
Jake, the co-author of TrekSumo, and I have a huge amount of experience using GPS and navigation devices. I’m ex-military, with 10 years of service in the British Army, and Jake is a seasoned hiker and explorer. Over the course of respective tours, we’ve encountered the good, the bad, and the ugly of satellite navigation devices (trust me: the military is great at buying and dumping heavy, U-G-L-Y equipment on the troops).
Anyway, time to quit the meander down memory lane. Let’s get this InReach review on the road.
Why Did I Choose the Garmin InReach?
I was looking for a replacement GPS and tracking system capable of wrapping up lots of functionality in one device. I’d been using the Garmin eTrex 10 for some time and was pretty pleased with it.
But there was something missing.
Communications.
Now, for most hikers and hillwalkers, comms isn’t such a big deal. Cell coverage for phones is mature and, in many places, well-established. Traveling through a communications dead zone is rare, and when you do find yourself in one it’s normally short-lived.
For anyone traveling further afield, say to the polar ice of northern Canada, things get tricky. Beyond a certain latitude the only way you’ll be able to communicate with the outside world is by bouncing your messages of a network of satellites in low-Earth orbit (sounds geeky, but the tech has been around for years).
Even your text messages asking your sister to feed the goldfish because you forgot before you set off on your sixth expedition aren’t going to get through. I pity the goldfish.
No terrestrial network exists.
And this was the problem I faced.
Numerous communications options exist, they include:
- Iridium’s satellite network
- Thuraya’s satellite network
- Inmarsat’s satellite network
- Two cups and several hundred miles of string!
I think you can see where this is going: in some regions of the world the only way you’ll be able to save your goldfish is through the dark sorcery of satellite comms. In particular, the SMS over satellite feature (which is awesome).
More Good Reasons for Choosing the Garmin InReach
SMS is good, but I needed even more functionality, including:
- Weather reports
- GPS functionality
- Tracking
- SOS features
- No requirement to connect a smartphone to access all features, unlike the InReach Mini.
The list above is my baseline. Everything else is nice to have. And the InReach has pretty much everything else.
Other reasons for choosing the InReach satellite communicator included:
- Size. It’s pretty compact
- Battery life
- Ease of use
- Operating temperatures
We’ll dig into all of these points, and more, as we progress through the InReach Explorer+ review.
Before we move on, let me add something to the mix. Before owning the InReach Explorer+, I used an earlier version – the DeLorme Explorer+. This incarnation of the InReach was pretty good, but had a few issues that prevented me from loving it the way a hiker should cherish their gadgets.
What’s in the box?
Surprisingly little! Obviously, there’s a navigation device in there. Beyond that, there is also a charging cable, a carry case, and some instructions. That’s it.
And to be honest, you don’t really need any more as, once the Explorer+ it’s charged, and you have paid for a comms plan (assuming you’re going to use the satellite communications features) you’re good to go.
When you flick through the paperwork that comes with the Explorer + you’ll find a couple of really important documents. The first one is your warranty; always fill this out, whether it’s online or sent by post, as it provides you with an additional layer of insurance should your Explorer plus experience difficulties a.k.a. fall off a mountain and not recover!
The second and equally important document you find is your satellite communications registration document. Definitely fill this one out as it will help as the benefits are twofold:
- You are you get insurance coverage for any emergency rescue as a result of your activating the SOS feature.
- If you lose you the device and it’s recovered it can be returned to the address held in Garmin’s central database.
Garmin InReach Construction
Okay, it’s time to examine the construction of the InReach Explorer+. We’re going to take a deep, deep dive into every possible aspect.
Please note that, for this section, the information you’ll see if applicable to both the SE and Explorer+ as they use the same chassis.
Colour Scheme
I have to admit when I first unboxed my Explorer plus I felt a little bit disappointed. The colours are what can only be described as “very 1970s”. Holding the device in my hands gave me flashbacks to Paisley’s flared trousers and kipper ties. Trust me, that wasn’t a good look so please don’t ever think going retro-70s style is a good thing.
I took a moment to think about what I’d signed up for when I bought this InReach. Would my fellow hikers cackle like a coven of witches when I whipped the garish satellite communicator from my pocket? After a few minutes of mulling over this question, I came to the most obvious answer: no!
You see, the bright nausea-inducing colour schemes of the InReach devices serve a useful purpose – they’re easy to spot if you drop them. Even in snow-covered regions. Here’s a story to illustrate how useful this seemingly insignificant design feature is…
Last year I was skiing across Norway, at a time before owning an InReach. I’d taken a tried and trusted GPS (my Garmin eTrex 10, reviewed here). The chassis of this particular GPS is bright yellow, just like the InReach SE+. On one of the longer legs, heading down from Finse, I carried out a navigation check but didn’t zip up my pocket.
At some point, my GPS fell slipped out of my pocket.
I only discovered this loss when I reached my campsite and needed to check the coordinates. Fortunately, I had a backup device, but I was very sad. My eTrex had been across the Arctic Ocean with me and had a Geographic North Pole stored as a waypoint.
A couple of days later, on another leg of my route, I met a German couple, a man and wife, who were skiing across the Hardangervidda. We chatted (I speak German) and I recounted my story. The guy reached into his pocket and said, “This must be yours.”
In his hand was my GPS. He’d spotted it lying in the snow only because of the bright yellow casing.
Thank you, Garmin. Your strange love affair with orange and yellow is appreciated.
Build Quality
On first inspection, this range of devices appears cheap and tacky. This is a surprise given the cost and when you consider that when you look at the Garmin InReach vs Iridium GO!, the latter has a satisfying robustness to it, even from a distance.
But don’t be deceived.
I’m impressed by what seemed to be what looked to be poor build quality. It was only after I’d picked up the Explorer plus and played around with it for a few minutes that I realised it is a pretty rugged device (I may have dropped it once, or twice!)
The body of this navigation communication device is exceedingly tough (I haven’t broken mine… yet) and water-rated to IPX7. I haven’t deliberately tested the claim that the InReach is ridiculously rugged as, at around £400, ($520) it’s an expensive way of putting Garmin’s claims to the test.
Likewise, the screen is said to be able to withstand huge pressure before it cracks. Again, I’m not going to test this as I quite like my Explorer+.
Keyboard Layout
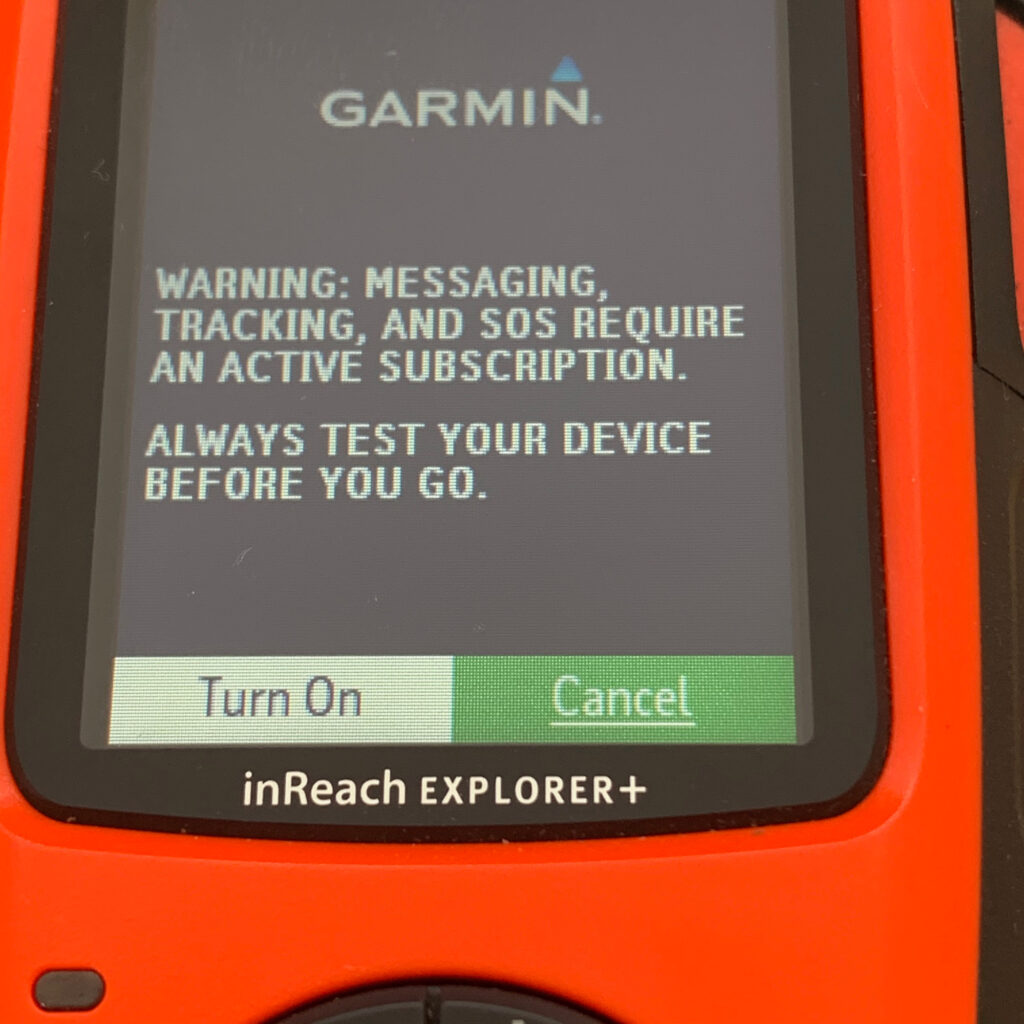
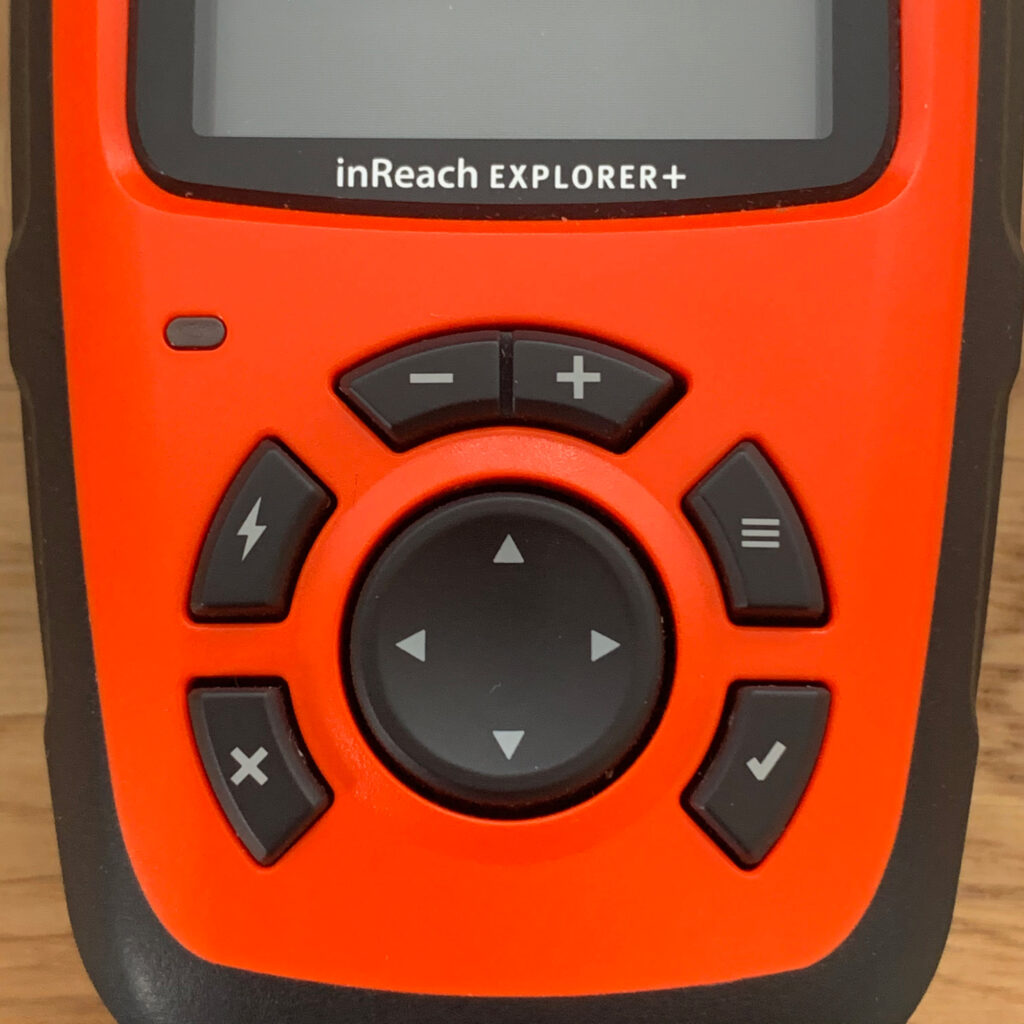
On the front of the Explorer are 6 buttons and a navigation pad. On the top, right-hand side of the body is the power button. To prevent accidental powering up and down Garmin has added a two-stage power cycle.
First, you turn on the device using the main Power button. The display lights up and requests that you confirm do you want to switch it on. Using the left or right arrows, highlight the okay option and click. If you don’t respond within five seconds the Explorer+ will shut down. I rather like this as it prevents accidentally switching on the device and draining the batteries.
On the front face of the device is the main navigation array. This consists of a circular pad with up/down and left/right buttons. In the centre is a circular button with the words the letters okay (as you probably guessed already, this is how you confirm settings or choose options when navigating through the menu system.
At the base of the Explorer plus it’s a small hatch. Pop this open and inside you’ll see a micro USB socket charging device. It’s good to see that Garmin hasn’t gone down the proprietary connector route, standardisation makes life so much easier. We’ll talk more about charging later, but for now, I’ll say that the battery life is excellent.
On the top left-hand side of the device is the rectangular projection gives many of Garmin’s devices their distinct shape. Inside is the GPS antenna. I have to admit that the housing look like it could be easily broken, but that’s not the case. My Explorer+ has taken numerous knocks over the past couple of years without affecting the integrity of the antenna housing.
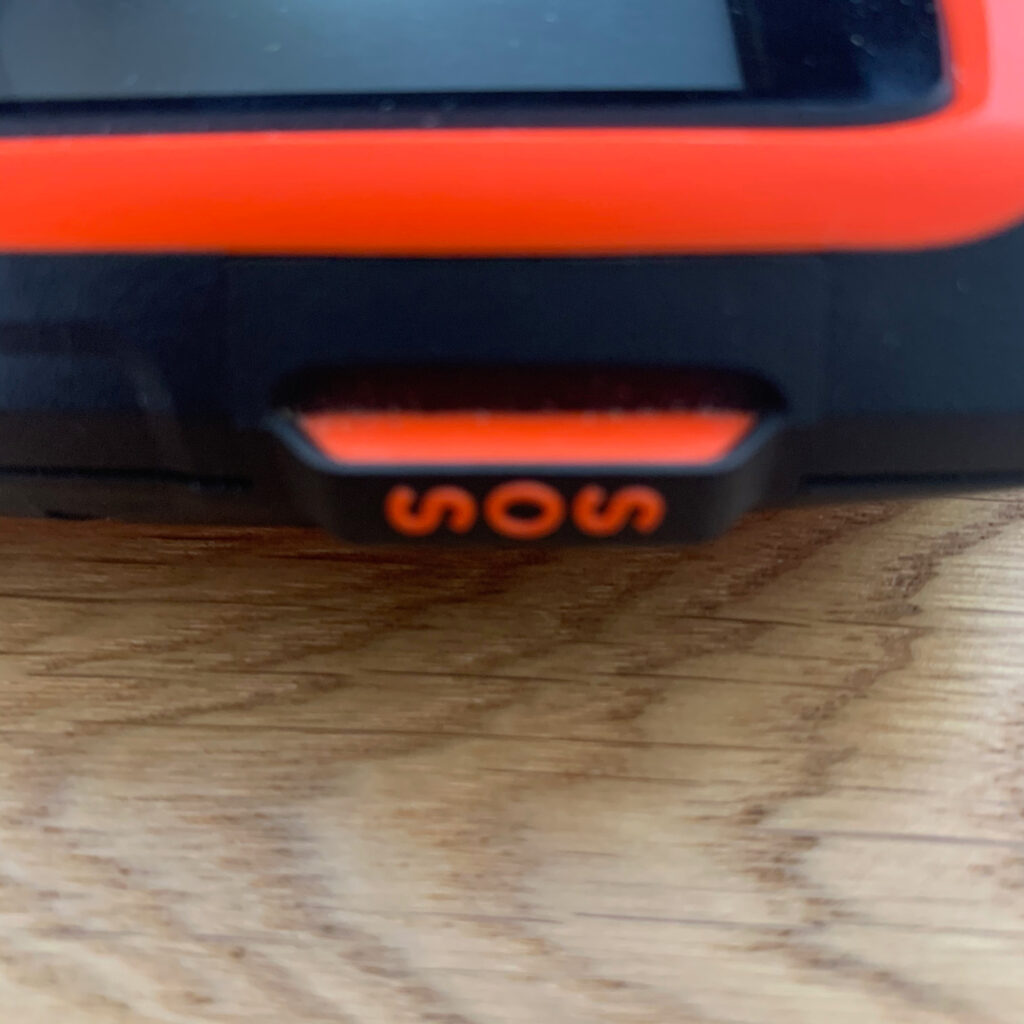
On the left-hand side of the body is a small hatch marked with the lettering “SOS”. When you pop open the hatch and look inside you see the school called touch to a hand. In the event find yourself in a life-threatening circumstance pop open the hatch lip open flick open the hatch and pull the cord. A signal will be sent via satellite to the agency responsible for monitoring and responding to emergency requests.
Note: Don’t activate this unless you’re in a real emergency. Unless you want to pay a hefty fine for misuse.
On the back of the body is a hatch that is screwed shut. Inside is the rechargeable battery. The battery compartment is water resistant to a depth of 1 metre for a time of 30 minutes. Only a qualified technician should open the batter compartment. Battery replacement should be carried out by authorised dealer repair company.
Quick note: The layout of the InReach devices should be familiar to anyone who has used, or owns a Garmin GPS 64. It looks as if this design has become the standard for higher-end devices.
Weight
The Explorer plus weighs 213.0 grams. This is slightly heavier than the average GPS but is still very, very light when you consider that the device gives you satellite communications facilities on top of the usual navigation functions.
For any ex-military personnel reading this, you’ll be pleased to hear the InReach is way lighter than the first-generation satcomm systems we used to carry in our rucks!
To be fair to contenders, the Iridium 9575 weighs 214 grammes and the Iridium GO! is only about half times the weight. Still, the Explorer+ is a pretty lightweight device.
At this point, I think it’s fair to mention that for anyone going on a multi-day trip or big thru-hike, you need to think about how you’re going to recharge the batteries. The approach you take will add to the overall weight you will be carrying. Typically, I take a solar panel and a couple of storage devices, cells that are used to charge my Explorer plus. This extra gear adds a couple of pounds in weight to my rucksack (or pulka)
One thing I do like is that the body of the Explorer plus has plenty of rubber panels! You can never go wrong with rubber. Sure, over time it might perish but I like the thought of knowing that the equipment I’m holding won’t slip out of my hands, even when my fingers are damp and cold.
The Garmin eTrex 10 is a great example of one of Garmin’s devices with strategically placed rubber sections that help maintain grip.
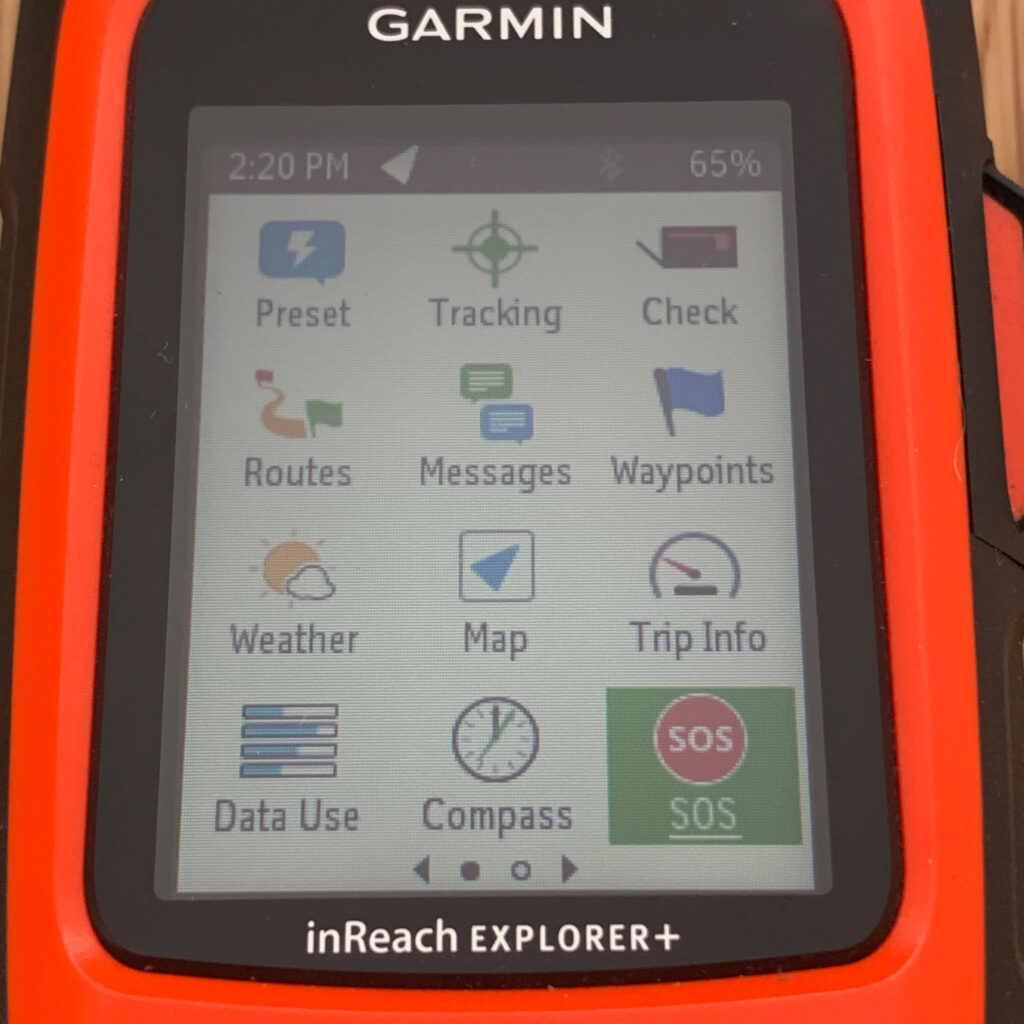
Garmin InReach Menu Quick Start
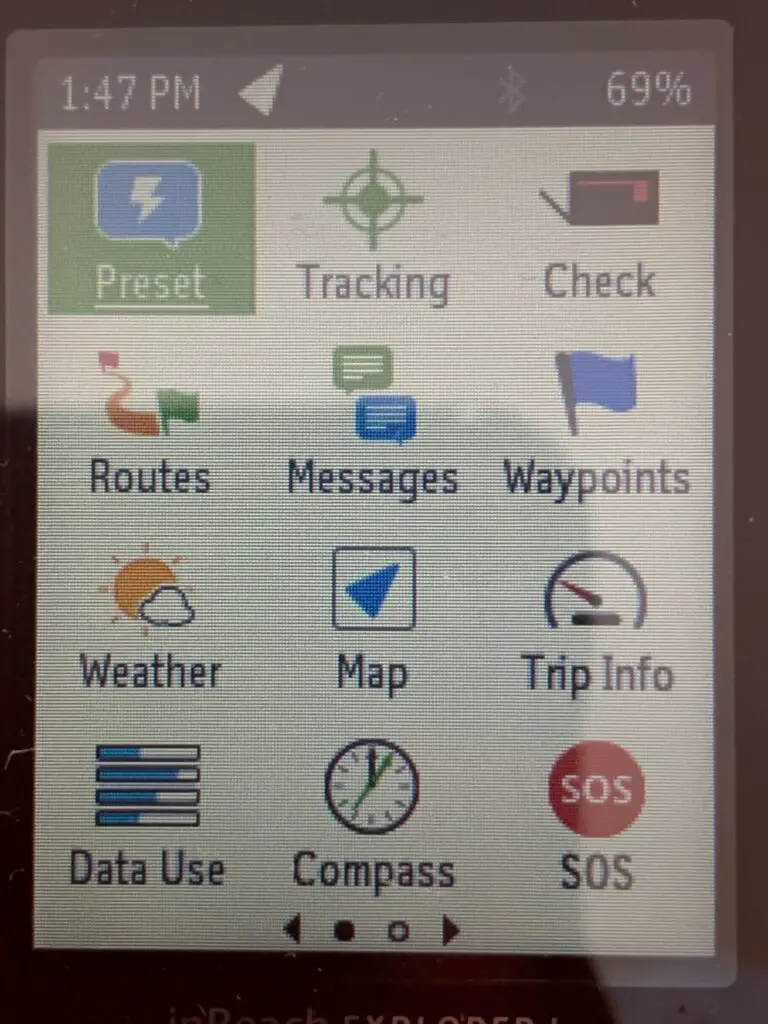
For the most part, the Garmin InReach menu system is pretty easy to understand and navigate. There are some features hidden away, but I’ve rarely found the need to use them. That said, I have accessed those functions at some point and feel it’s worth taking you through a quick start tour.
- Pre-set contains a series of pre-configured messages – by default, there are 3 usable pre-set messages and you can add more based on your personal preference. Pre-sets are useful for quick updates on the progress of your hike or expedition.
- Tracking. When activated, the tracking function will send periodic location updates. The tracks can be shared via social media, or plotted in Garmin’s online mapping tools (found at explore.garmin.com)
- Check. Quite simply a simple test to ensure you can connect to the Iridium network. Useful as a way of ruling out communications issues when troubleshooting the InReach.
- Routes. One of the core functions, routes have been available in Garmin devices since the dawn of mankind. Routes can be created and imported using the Garmin Express tool, or plotted manually (don’t attempt the latter unless you have some serious time on your hands… like, a lifetime!)
- Messages. This function allows you to send messages and read any that have been sent to you. Writing messages on the InReach keypad can be likened to counting the grains of sand on a beach – it takes some time. A much better approach is to pair your InReach to a tablet, or smartphone, which gives you access to voice-to-text, or at least a more finger friendly keyboard.
- Waypoints. Drop waypoints as you move or import them before you set off. They’re best used for calculating the distance and bearing of each leg of your route.
- Weather. Keep up to date with the latest weather reports. The free version is pretty basic, only giving your information for 3 days. Pay a little more and you’ll get advance weather notifications. I recommend you take the latter option.
- Map. Provides you with a detailed map (as long as you download them from OpenMaps). This feature is not available on the Garmin InReach SE+.
- Trip info. Kind of like setting the trip in a car – you get to see the distance traveled, speed, trip time, average speed, etc. Useful if you’re trying to break a record like I was when I decided to cross Lake Baikal.
- Data usage. Simply tells you how much data you’ve used up. Useful if you’re trying to stick to a budget or want to argue with Garmin’s help desk.
- Compass. An accurate compass which can be used as a backup to a conventional compass.
- SOS. Activate and wait for the helicopter to scramble to your rescue. You have 5 seconds to cancel if a) you’re not really in an emergency situation b) you managed to rescue yourself and are therefore no longer in an emergency situation.
- Contacts. You can add these manually or allow the InReach to hoover up your contacts list when you connect to your smartphone.
- Location. Supplies you with details of your current location. This is a great way of cross-referencing your location on a map.
- History. Shows a complete history of waypoints sent, messages, etc.
- Test. Pings the satellite network to ensure connectivity. Always check before you set off.
- Settings. More granular controls including language, mapping data, units (km vs mile), etc.
Functionality
It’s time to dig deeper into the guts of the Explorer+ and find out exactly what you get for your money.
As you’d expect Garmin’s strong heritage of building GPS navigation units is at the heart of this device. full show. The closest device I can find in terms of functionality to the InReach range of satellite communicators is the GPS 64. In fact, all three of the devices are near identical apart from a few bells and whistles to differentiate them.
For anyone interested, here’s a Garmin GPS 64 review that will hel fill you in on the full ins and outs of this top of the range navigation unit.
Okay, let’s start digging in and see what the Explorer plus has to offer.
Like pretty much every other device in Garmin’s range of GPS-enabled devices, the Explorer plus is capable of using both the GPS American GPS and the Russian Glasnoss satellite networks. What this means is that regardless of where you go you’re almost 100% guaranteed of being able to get a signal and to put your roots, find your location, et cetera. That is unless the Americans, or Russians, decide to turn off their satellite networks and then it’s back to the good old days of map and compass.
If you need a more accurate device, you going to have to pay a lot more money to get one.
The Explorer+ is accurate down to about plus or minus 5m. This is pretty standard for most modern satellite navigation units. The only devices you will find giving pinpoint accuracy belong to the military and are therefore not available to us civilians, or like me ex-service personnel.
To be honest, if you pair an InReach with good map reading skills, you’ll have a system just as precise as the one the Armed Forces use.
And if you need a device that has pinpoint accuracy, you’re going to have to pay a lot of money to get that.
Waypoints
The Explorer+ can store around 5000 waypoints, which should be more than sufficient for any hiker. Unless you’re planning to circumnavigate the globe. At that point, you’ll need to start thinking about segmenting your journey and only storing the waypoints you need.
For the rest of mere mortals, 5,000 is an awful lot of waypoints. I’ve never needed to store so many good references. Not even on an expedition covering 600 km. The one reassurance this does give is that if you need to do a lot of micro navigation then you can probably rest assured shored that you’re never run out of memory slots for the waypoints.
Adding Waypoints to Your InReach
Gamin has made it easy to add waypoints. You have three options:
- Old-fashioned route of typing each grid reference using the keypad
- Via a GPX upload
- Via the smartphone app (my preferred option)
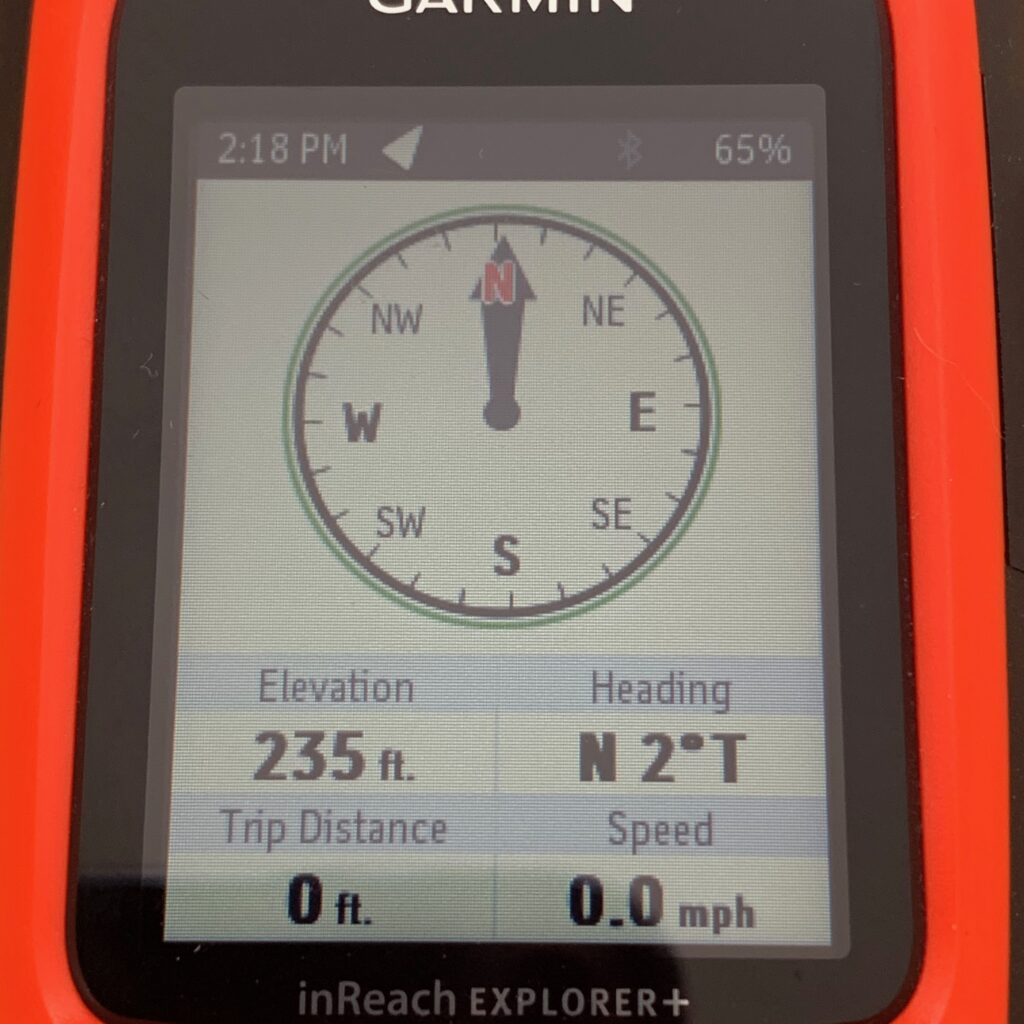
Magnetic compass
Well, it’s actually a digital compass but he still looks pretty good and it’s very accurate. I’ve tested the compass alongside a manual compass end the results are spot-on. I’m not 100% ready to throw away my handheld compass as electronic devices are more prone to issues than my Silva compass.
I tend to use the digital compass as a backup to my handheld compass, to check bearings on my routes.
Route planner
This is another feature this been available in Garmin GPS for a very long time. The route planner allows you to group a number of waypoints together to create a complete route for your hike expedition. One of the features I do like about the route planner is the proximity alarm is built in the built-in proximity alarm which allows you to create a notification when you’re within a certain distance of a particular waypoint
InReach Messaging (SMS Over the Iridium Satellite Network)
For me, this is one of the biggest draws of the InReach range. The ability to send text messages to anywhere, from anywhere, is THE standout functionality when compared to other GPS devices.
Thuraya and Iridium also provide SMS. Having used all three options, I find Garmin’s approach much easier to use. Although each device requires time to connect to the respective satellite networks, InReach doesn’t need to stationery – I’ve often sent a message during a pause in my travels, then set off before receiving the familiar chirping confirmation tone to say the message has been sent. Devices like the Iridium GO! are notorious in the need to be immobile in order to transmit a message.
So, sending a text message over the satellite network is really easy.
Note: the pre-set messages we looked at earlier in this review are nothing more than pre-configured text messages.
InReach Messaging Types
Before we move on, I’d like to give you a quick overview of the different SMS formats you can send:
- Pre-set. As mentioned earlier, this SMS message is created and stored on the InReach and is accessed via the pre-set menu option.
- Quick Message. Similar to pre-set messages in that they are intended to be configured before you set off on your expedition, a quick message is created and stored on the Garmin InReach website. Once created, you synchronise the messages with your InReach. Personally, I’ve never found a need to use this option.
- Plain old SMS. On-demand, written in the moment. The limitation of 160 characters is a little annoying, but it’s not a massive issue.
SOS Function
As mentioned earlier, the SOS function of the InReach can be activated by opening the hatch on the right side of the device. Inside you’ll see a small button that’s recessed into the body of the InReach.
Press and release the button to activate the SOS beacon. If you make a mistake, you have 5 seconds in which to cancel by pressing again.
You can also use the menu to switch on the SOS beacon.
Finally, if you use the smartphone app to control your InReach (a move I highly recommend), you can turn on the beacon using the slider.
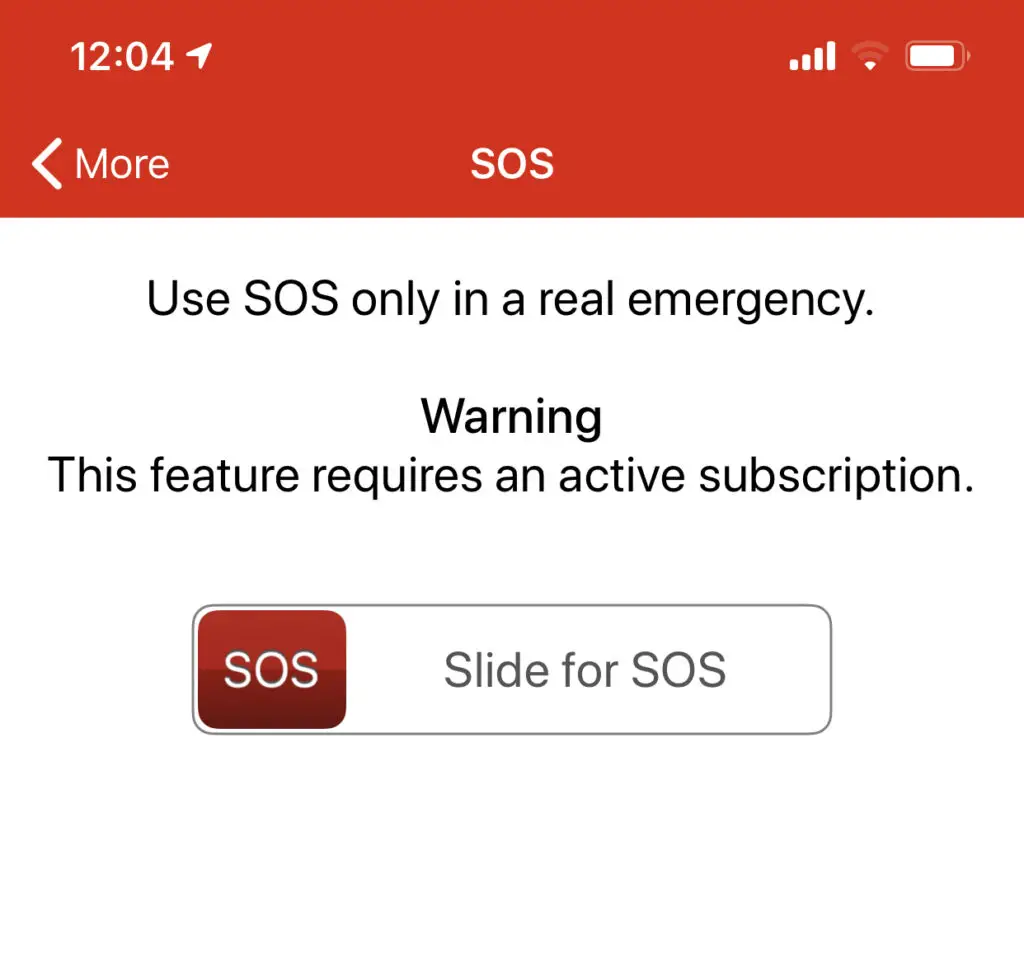
The process is simple:
- Open the Earthmate app
- Select ‘More’ from the bottom right
- Click ‘SOS’ and slide to be rescued.
How Does the InReach SOS Work?
The SOS beacon uses the Iridium network to send an emergency signal. When you trigger the distress beacon, your message is routed to GEOS (an organisation responsible for managing distress calls).
GEOS doesn’t carry out any rescue activities. Instead, they maintain a huge database of groups and first responders who carry out the actual task of finding and rescuing people in difficulty.
As well as coordinating rescue efforts, GEOS will message you and provide updates on the progress of first responders. If you’re injured, you’ll get advice on how to treat yourself, including ways you can make rescue safer for you and the emergency teams.
For peace of mind, check out these Garmin stories of successful rescues.
There is one issue with the SOS feature: it’s not popular with many Search and Rescue teams. Why? Because, sadly, some people are too quick to assume their lives are in peril. Numerous reports of hikers having activated the SOS beacon when their injuries, or situations could have been resolved without intervention.
In order to use GEOS you’ll need to register your details.
As a precaution, I advise taking out additional insurance for when you’re out in the wild. Garmin has links to some comprehensive packages that will cover you for $100,000+ of costs, should you need them.
Taking out insurance isn’t mandatory, but it will protect you in the event of a first responder organisation finding you liable for the cost of the rescue.
Waypoints and Routes
Normally I like to break functions down into their review sections, but that doesn’t make sense when looking at waypoints and routes.
Neither of these functions uses a unique or independent technology – they both rely on being hand cranked (by that, I mean that you have to either type in or upload both routes and waypoints).
Sharing Routes
One really nice feature Garmin provide is route sharing via a web interface. Log in to the Garmin site and you’ll find an option to share your journey via social media, email, etc. Anyone opening the link can follow in your footsteps, real-time, as you stomp through the wilderness.
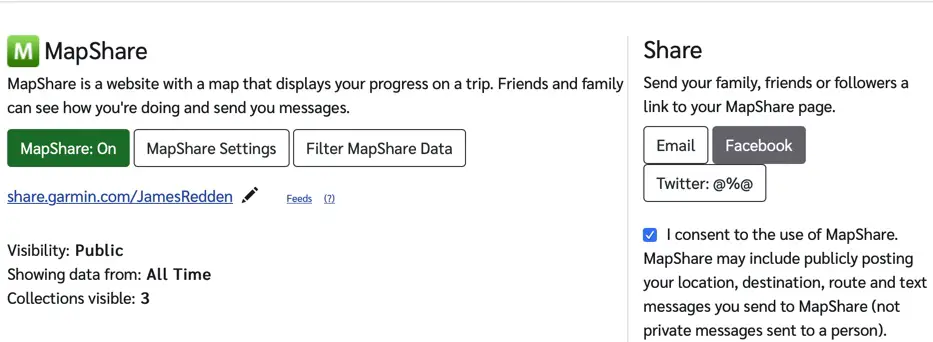
Any waypoints you add are visible, including those left when tracking is enabled. Sign up and login at: explore.garmin.com
Garmin InReach Tracking
What are waypoints?
The easiest way to describe a waypoint is as a geographic marker (grid reference, geographical feature, etc) that you aim at. Your route, which we’ll come onto in a minute, can be made up of multiple waypoints.
Waypoints on the Garmin InReach can be uploaded as a .gpx file, manually entered using the keypad, or selected from the menu option whilst you’re traveling.
One point to consider when selecting waypoints – it’s your responsibility to ensure your route is safe and passable.
Mapping
Garmin maps on the InReach Explorer+ aren’t the best (but still better than the SE+, which has no map download option.) As a GPS and satellite communicator, this is a great tool to have in your rucksack. At best, I’d say the mapping functionality is okay.
To my mind, the screen is simply too small to give you a useful view of the terrain. I highly recommend you install the Earthmate app. You’ll get much more detail using the app and I find manipulating maps to be far easier when done on my iPhone, or iPad.
In case you’re wondering, the SE+ has only very basic mapping – at last check, there were no contour lines, or spot heights, shown.
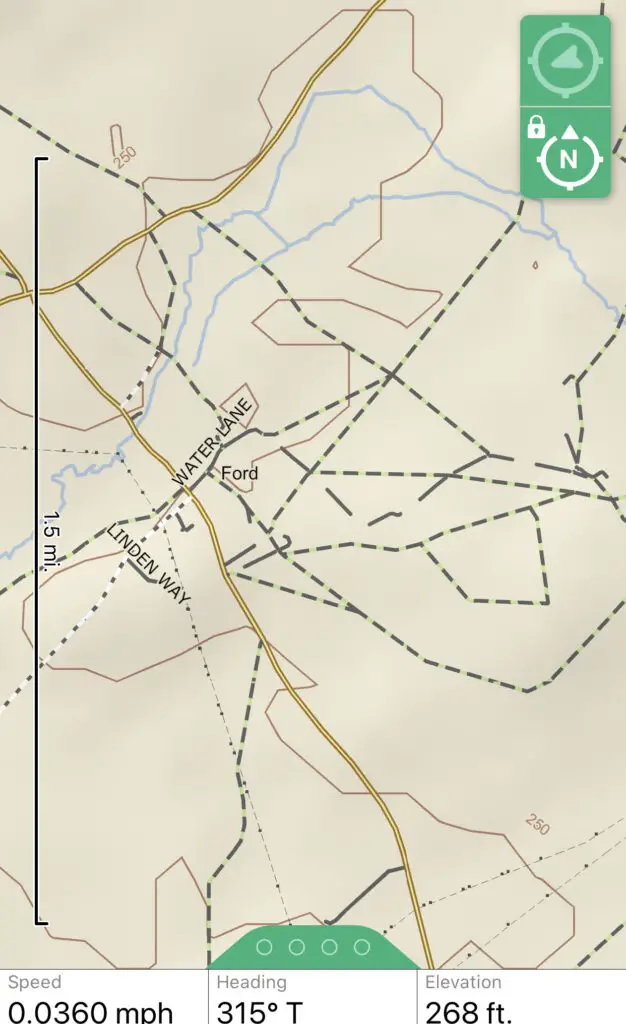
Note: regardless of which mapping tools you use, the InReach will not optimise the routes you create. What I mean is that you’ll be taken on a straight-line route that doesn’t take geographic features into consideration.
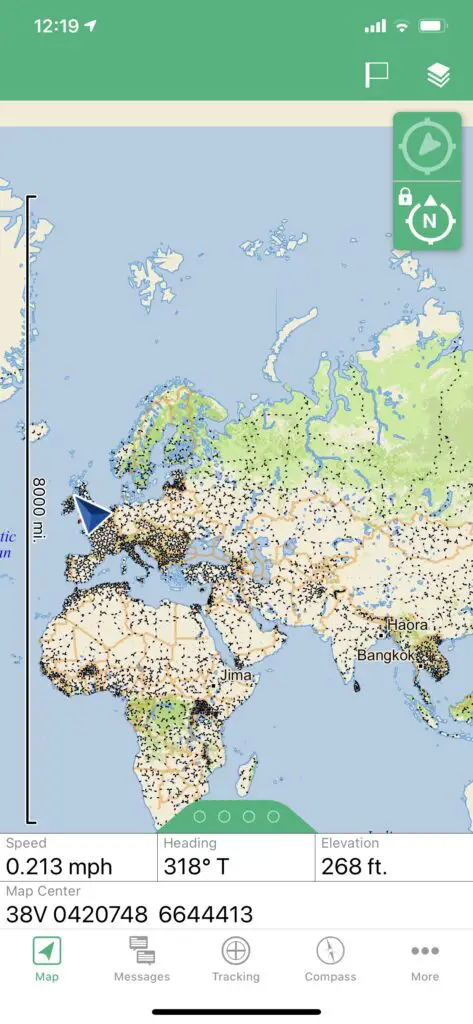
Trip Data
Trip data on the InReach gives you stats on your current trip. It’s not a function I use often as it requires the unit to be switched on for the whole time you’re moving. This means you’re going to be using a lot of power just to see statistics about your journey.
If you have a ready supply of power, such as storage cells and solar panels, this might not be an issue. But do consider how long it takes to recharge your cells. If they’re only 50% charged at the end of the day you might soon run out of juice.
For anyone who needs, or wants, trip data, here’s what you get:
- Trip time.
- Speed max.
- Moving average (this is your average speed whilst moving)
- Trip distance (for the time you’re traveling and recording)
- Barometer (not sure why this is here, probably would have been better located inside the weather report function)
Weather Reports
When planning a hike or expedition, best practise tells us that checking before setting is advisable. But we already know that because we are master planners who value our lives and those of the people we travel with.
Sadly, Mother Nature does not respect plans!
Last year I was in Finse, Norway. Prior to setting off, I ran through a series of pre-expedition checks, including the weather. All looked good.
3 days into my ski, I pitched my tent for the night. The day had been good. A hard crust of snow made travel easy.
At around 1 o’clock in the morning, the creaking of tent poles woke me. Stormy howls battered my tent, distorting and straining the material. Sleep was intermittent, and my fears of tent collapse were amplified by every turbulent gust of wind.
Nothing in my pre-trip weather forecast had suggested a storm of any magnitude.
In the morning, my eyes ringed red and sore, I checked the InReach weather forecast. Wild storms for the next two days.
For two days I shambled through whiteouts, staggered as gales tried to knock me down.
Pretty dramatic, but partly my own fault. I should have checked the forecast every day whilst in Norway.
The Garmin weather forecast built into the InReach, and other GPS units, is good for three days. Updates are sent via text and localised i.e. for the geographical area you’re in at the time the weather report is sent.
Pay another $1 per report and you enter the Premium model. You’ll get advance weather forecasts for the next 7 days. In addition, you’ll be able to see weather patterns at regular intervals (every 1 to 2 hours for the current day, then 3 to 6 hours for the next day, and then 12-hour intervals for every day after the first two).
The following key information is available in the weather forecast feature:
- Temperature
- Precipitation (rain and snow)
- Wind speed
- Cloud coverage
Upgrading to Premium Garmin weather reports and you’ll get:
- Same information as above, plus the more granular forecasts mentioned above.
Battery Life
Garmin tells us that the InReach can run comfortably for 100 hours whilst sending tracking waypoints every 10 mins. I have seen some grumbling about the InReach battery life but can’t see why anyone would want to buy an extender.
When planning a trip, you need to have a reasonable idea of how long you’ll be traveling. Once you have that figure you can work out if you simply need to take a couple of units like these PowerMonkey Extreme power banks, or solar charging equipment like the kind sold at mobilesolarchargers.co.uk (great gear, great guy).
What is interesting, and did make me chuckle, is that Garmin’s figures say a fully charged battery will be drained after 3 years of not being powered up.
Another point to note: the more messages you send the shorter the battery life. It’s not possible to give a precise figure. The number and size of text messages you send will affect battery life i.e. sending more big messages means you’ll run out of juice faster.
Battery life can be improved through some simple actions: adjust the screen brightness down, turn off Bluetooth when not in use, and keep your InReach warm in cold climates.
Phone Connectivity
We touched on this earlier, now we’re going deeper.
Garmin has done a great job of making the InReach compatible with Android and Apple smartphones. The Earthmate app is pretty useful, although not perfect, and it’s really easy to connect the Explorer+ to your phone.
Once connected, and using the Earthmate app, you have the full flexibility to use a touchscreen to control the InReach. Trust me – unless you’re in an emergency situation and your phone is not operable, writing lengthy messages using the InReach virtual keyboard will result in calloused fingertips.
The only downside with phone connectivity is that the Bluetooth connection required to pair the devices requires additional power. It’s not much, but it will affect battery life.
Here’s a list of the key functions available via your phone:
- Setting, viewing, and deleting waypoints.
- Sending messages.
- SOS activation.
- Start/stop tracking.
- Map downloads to your phone (much easier to use than those on the Explorer+)
Personally, I only use the phone connection when I need to carry out tasks that are made difficult by the Garmin virtual keyboard.
Improvements to the InReach Explorer+
No Garmin Inreach Explorer+ review would be complete without the obligatory moaning feedback section.
In general, I feel Garmin has pretty much got the Explorer+ right. It’s rugged, the battery life is good, and the menu system is pretty intuitive (okay, I’m not going to delve into the Settings as they are pretty technical as well as being a tangle of functions!)
What Could Garmin Improve on the InReach Explorer+?
A few things:
- Better support for maps, good quality maps.
- An easier-to-use virtual keyboard.
- Relocate the antennae – I’m always worried about snapping it.
- The option of swapping out batteries without having to send the unit off to a technician.
That’s it really all I can think of.
Wrapping Up This Garmin InReach Explorer+ Review
It’s not perfect, but what device is? As a GPS, the Explorer+ is fantastic. It also does a very good job slotting into the satellite communicator niche, even though it doesn’t support voice communications.
Right now, the InReach products are the only way you can have a two-way conversation beyond your expedition. You could go down the route of buying something like an Iridium GO!, but the data packages are far more expensive than those offered via Garmin.
If you need a rugged device that allows you to send messages from anywhere in the world (Iridium’s satellite network covers pole to pole, so is truly global), then this is the device for you.
If you don’t need satellite communications, then stay away from the InReach. You’re much better off buying a Garmin GPS 64, or something smaller and less pricey – like the eTrex 10.
I hope this Garmin InReach Explorer+ review has been helpful. Should you decide to buy one, we’d really appreciate if used the links on this page – we get a little cash back from suppliers and the money helps us maintain TrekSumo. Thank you.