Lightweight Camping Stove Types (Which is Best for You?)
Choosing a lightweight camping stove should be an easy task, but is it? Many factors will affect your decision and some of the considerations you’ll need to think about include:
- The environment in you’ll be hiking and camping in
- Burn time
- Size and weight of fuel cannisters/duration of you trip
- Ease of maintenance and repair.
This list is small and is based on my own experience of camping and hiking the U.K, U.S, the jungles of South East Asia and Arctic Ocean. Your adventure might require some additional thought so feel free to use the above bullets as a starting point.
We’ll cover off these points later in the post. First let’s look at the various options available.
Lightweight Camping Stove Types
Choice of fuel will affect your stove selection. There are currently three options: gas cannister, bio fuel and everything else (by which I mean white fuel/petrol/paraffin). I’m not going to delve into bio-fuel stoves – they are an amazing technology, but they have one major issue: if you can’t find any wood to burn you ain’t going to be cooking! What this means is that you can count them out as a cooking option on a ski tour of somewhere like Lake Baikal, or Greenland.
Gas Fuelled Camping Stove
There are three models of gas
Cannister – screw onto gas cannister. Lightweight, easily stowed, probably cheapest option for travellers. Can be unbalanced easily, not suitable for extreme cold environments, cannisters should be recycled i.e. don’t leave them in your campsite.
Examples of cannister stoves include the mighty MSR PocketRocket 2, Snow Peak GigaPower and Vango compact gas stove.
Integrated cannister – cooking pot and cooker either locks or screws together. More expensive than standard cannister and also requires you to recycle your gas cylinder. Integrated system doesn’t allow campers to use different sized pots and pans, although some manufacturers now sell inserts for the cooking pot. Performs better in cold than standard cannister stove but is heavier and can topple over with ease.
Examples of integrated cannister stoves include the NIC IMPEX SA Jetboil Zip Camping Stove (here’s a good review by Jake) and the Highlander Mens Blade 2.
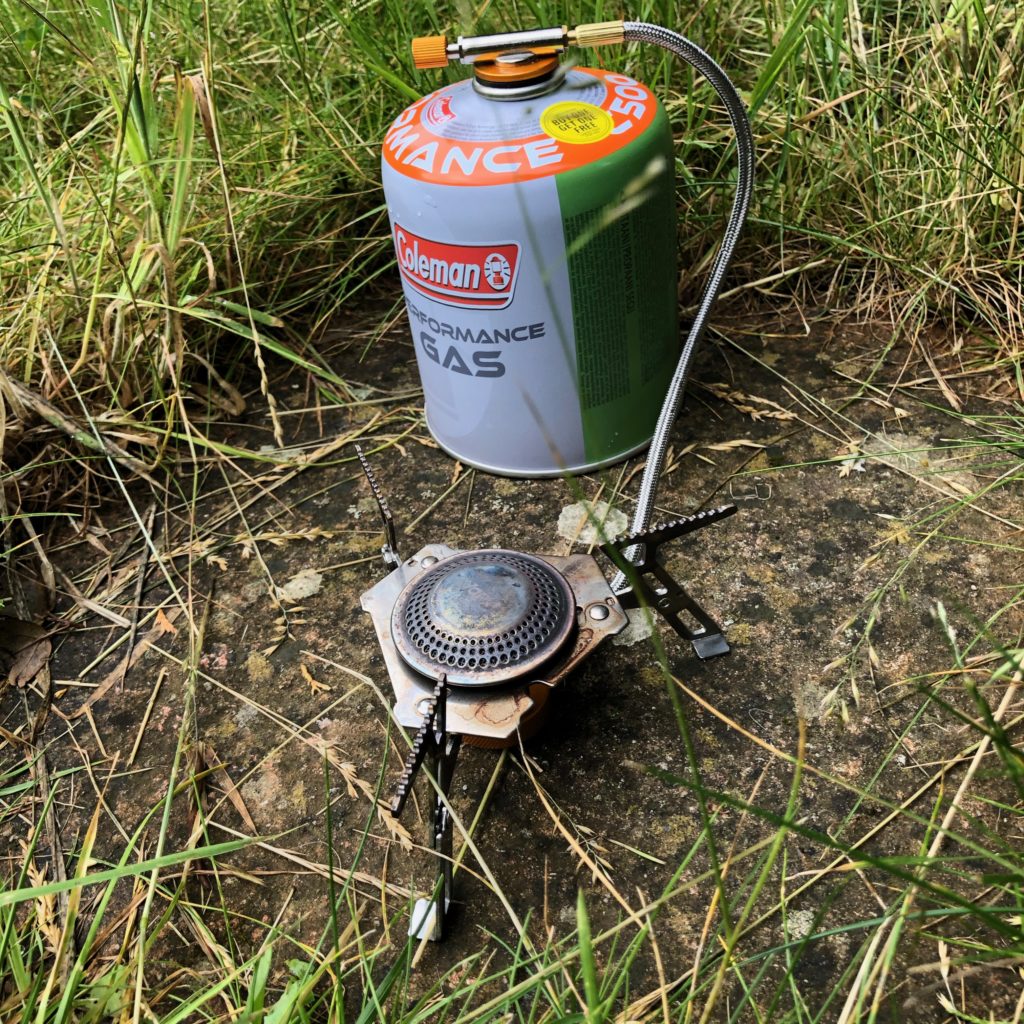
Remote cannister – cooker and cannister are connected by a length of hose. Lighter than an integrated system, but still bulkier than standard cannister. One big plus point over standard – wind shield can be used as there is no risk of the cannister overheating.
Examples of remote cannister stoves include the Primus Gravity III, the MSR Windpro II and Vango folding gas stove (I love this – cheap as chips and incredibly robust).
White Fuel Powered Stove
My favourite type of lightweight camping stoves uses white gas, a mixture of C5 and C6 hydrocarbons. Whilst not to everyone’s taste, white fuel stoves have never failed me on an expedition. Like gas offerings, there are a number of models and pros and cons to this type of lightweight camping stove.
Integrated fuel tank. Models such as the Coleman Peak stove have an integrated fuel tank which can be a little bulky for some people’s taste. Unlike the gas-fuelled version, the Peak stove can be used with a windshield and without fear of the tank exploding. Stoves of this type can be used with a number of different fuels including petrol and Coleman fuel.
External fuel bottle. My all-time favourite camping stove range is produced by Mountain Safety Research. All of MSR’s offerings utilise an external fuel bottle attached to the cooker via a heavy-duty hose. This configuration is useful when you run low on fuel and need to switch to a new supply – an act not easily achieved when you need to swap out a gas cannister on a hot stove.

Pros
- Fuel is cheap when compared to the price of a gas cannister
- Burns incredibly hot and is ideal for extreme cold and high-altitude environments
- A number of fuel options are available for these stoves
Cons
- Require maintenance and a thorough knowledge of the stove’s workings. Warning: don’t be tempted to take one a white fuel stove on your camping trip unless you are fully versed in maintenance and repairs.
- More expensive than gas stoves. For example, the MSR Dragonfly (my personal favourite and available here) costs about £100. A comparable gas camping cooker will set you back about £35.
- White fuel stoves tend to be heavier than gas powered alternatives.
Solid Fuel Cookers
Way back in the mists of time, the British Army used to issue folding, solid fuel cookers. Hexamine tablets were used to heat pots full of water and food. Nowadays this type of cooker is kept for emergency situations only – trust me, if you’ve ever tried to cook your boil-in-a-bag spaghetti bolognaise on one of these cookers you’ll understand why.
Pros
- Lightweight
- Very compact – quite literally fits in your pocket
- Cheap as chips
- Tablets can be extinguished and used at a later date.
Cons
- Low heat output. Don’t be thinking you’re going to serving piping hot food when you use one of these cookers.
- The paraffin content of the tablets will leave the base of your pots and pans blackened.
Camping Stove Safety
It goes without saying that you should always consider safety as THE priority when using you camping stove. There are numerous views on the best and safest places to use your stove and most people tend to agree you shouldn’t cook inside a tent. But what happens when you’re travelling through an extreme environment such as one of the polar regions? The chances of you cooking outside are near zero (which is considerably warmer than the average external temperature!)
How to Use Your Stove Safely in Extreme Environments
Cooking on a camping stove in extreme environments requires some consideration. Here are a few pieces of advice given by Eric Phillips, Master Polar Guide and owner of the polar expedition company, Ice Trek:
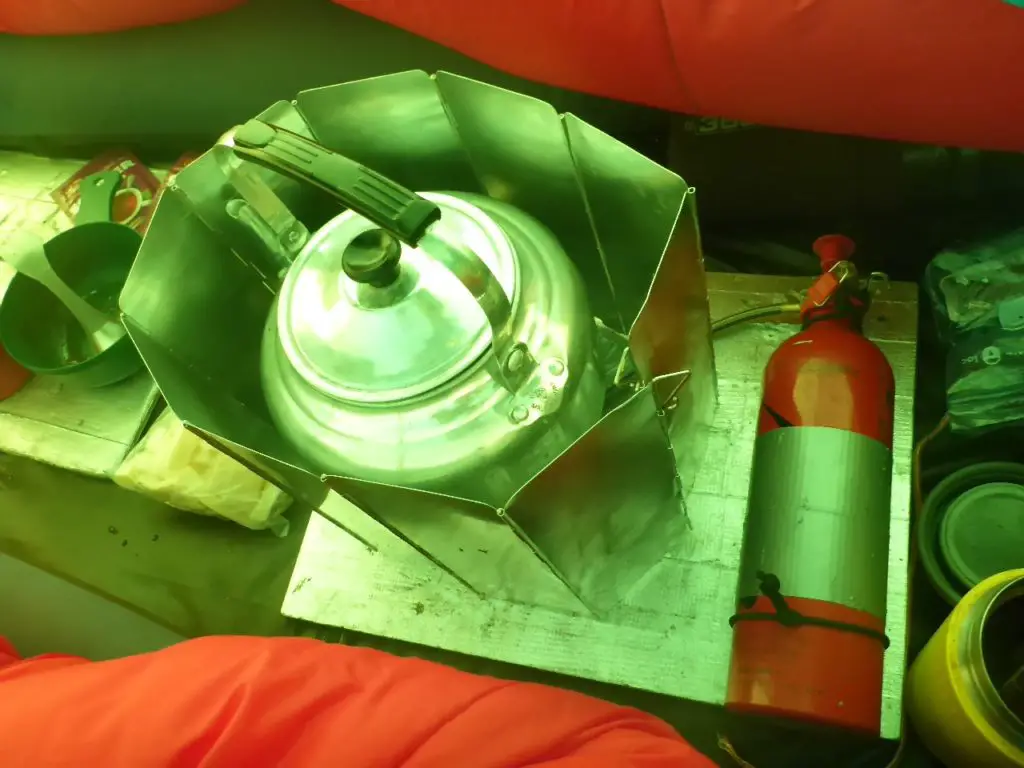
- Secure your stove to a cooking board (see image below). The board stabilises the cooker and helps prevent the unit from toppling.
- Leave the tent vestibule partially unzipped. In the event of a tent fire, throw the cooker and fuel out of the door.
- Always have a fire blanket to hand.
- Use a flame guard to reduce the risk of fire and, equally important, direct more of the heat from the stove up into the base of your pots and pans.
- Don’t refuel your cooker in the tent. Always carry out this task either in the vestibule, or outside and well away from naked flame.
- Consider digging a pit in the vestibule for use as a cooking area. Safer than cooking in the main body of your tent, but still subject to the same precautions.
- Use a shove to control ‘flare up’. This mainly applies to lightweight camping stoves that use white fuel. When first lit the cooker can sputter which produces flares that can burn your tent. The video below demonstrates an easy way to control and reduce flaring.
These tips might seem trivial, but please don’t dismiss them. A couple of years ago I decided to do a solo 250km across the Hardangervidda and Eidfjord regions of Norway. The weather was ferocious and, as you can imagine, it was a pretty tough journey. Raging storms battered my tent and I spent numerous nights laid awake listening and watching for any sign my tent might give way under the pounding of the storm. Fortunately, my Keron 2 GT held (and has served me well on numerous other trips).
Towards the end of the ski I was tired and starting to make mistakes. I remember setting up camp two days before this particular journey was due to end. I transferred my gear, food and stove into the tent, then settled in for the evening. I connected the MSR fuel bottle to my dragonfly stove, checked the seal and then primed the system. Everything looked good.
The stove lit, I pumped the primer to add more pressure to the fuel bottle, thereby increasing the temperature of the flame. As I pumped, the seal, which wasn’t secured properly, gave way and a jerk of fuel arced through the air, across the stove’s port supports and onto the floor of the tent.
A moment later the centre of the tent floor was a bonfire. The stove went out of the door and the flames smothered with a fire blanket. That was a close call – parts of the Hardangervidda are remote and rarely travelled and the loss of my tent would have been disastrous, even fatal.
General Safety Tips for Camping Stove Use
Let’s step away from the extremes and the risk of turning your campsite into a smouldering crater and look at the how you can prevent tent fires.
- In temperate environments don’t cook inside your tent. Not only do you risk starting a fire, but there’s also the carbon monoxide risk associated with white fuel cookers.
- Keep spare fuel stored well away from your cooking area.
- If at all possible don’t use a wind shield with a gas-powered stove. The reflected heat might cause the cannister to combust.
- Use long stalk matches (what we call ‘cook’s matches’ in the UK) to prevent burning your fingertips when lighting the stove.
- Tuck loose clothing away. Both my Carinthia and PHD down jackets has a number of scars courtesy of an MSR stove.
- Even though butane is non-toxic it’s always a good idea to cook in an unconfined space. This option may not always be available, especially when you’re being lashed by storms, so ensure good ventilation.
- Please don’t be tempted to use your camping cooker as a heater for you tent. Admission: I’ve done this in the past and, whilst I quickly made a toasty sleeping environment, had some near misses. If you’re cold, pull on an extra layer and get into your sleeping bag .
Some of these tips are blindingly obvious. In the past thirty-odd years of hiking, from my early days as a beginner to now, I’ve taken risks. Fortunately, most of travels were solo and my antics posed zero risk to anyone else. Now I like company on my travels. Self-preservation is high on my list as is protecting my team mates.
Primary Considerations When Choosing the Best Lightweight Camping Stove
Now that you have an idea of the types of stove available, let’s loop back to the questions posed at the start of this post.
Where Will You Be Using Your Stove?
As mentioned earlier, your choice of destination will affect the stove you select. Models that use white fuel are best suited for high altitude and extreme cold environments. I have used a Jetboil when training on the Midi and whilst I did manage to make a warm drink, the overall results were less than impressive.
If you can, buy a stove with a pressure regulator as this will improve performance in extreme environments.
What Is Burn Time and Why is it Important?
Burn time is a measure of how long it takes a stove to boil a specific quantity of water. My Vango compact gas stove, which is perfect for camping in the UK, takes about 5 minutes to boil a litre of water. My MSR Dragonfly boils the same quantity in about 3 minutes. Those extra two minutes might not seem like much, but when you’re cold and hungry the time seems like an eternity.
Also, the quicker you can boil water the less fuel you use.
What Impact Does the Size and Weight of Cannisters Have on Your Expedition?
Lugging countless gas cannisters in your backpack is no fun. Go on a long trip and you’ll find the additional weight can be a hinderance. Whilst white fuel stoves also require you to carry fuel bottles you can reduce the number by taking your extra fuel supply in a plastic container.
Is Your Stove Easily Maintained and Repaired?
Probably one of the most important questions you can ask yourself is around the maintenance of your camping stove. Failures are common, in particular blockages to pipes and jets. Always choose a cooker that is easily repaired. If the price of a higher end stove is too high, take a spare.
One piece of advice: learn how to maintain and repair your stove with your eyes closed. In particular, get to you know how use spares kits.